Zig IDE (Part 1): Project Initialization
It has been a long time since my last post, hasn’t it?
Background Information
It is proverbial that the IntelliJ Platform has provided a solid foundation for building and developing powerful development tools for developers. Indeed, it is no less apparent just by looking at the IDEs JetBrains themselves built on top of the platform - IntelliJ IDEA, CLion, RustRover, etc., leveraging the immense potential of developing on the IntelliJ Platform.
Obviously, a plethora of plugins for JetBrains IDEs have been built using the APIs provided by the IntelliJ Platform, but very few have taken on the task of attempting to build a complete IDE with it. Thanks to the fact that the entirety of the IntelliJ Platform is open source ( including the IntelliJ IDEA Community Edition and PyCharm Community Edition IDEs), developers can read its code to understand how developing an IDE using the IntelliJ Platform is done and try at it themselves.
Android Studio is in fact built on top of the IntelliJ Platform, one of the most prominent IDEs for Android development. This also shows the great potential the IntelliJ Platform possesses to build paramount development tools for various workflows.
Anyway, this is the commencement of an n-part blog series covering the development of an IDE built on top of the IntelliJ Platform from scratch (where n is a positive integer of course), both as a fun “hobby” project and may also serve as reference text for future developers who also happen to embark on this very same I-don’t-know-what-colour brick road of writing an IDE using the IntelliJ Platform.
Forking and Cloning the IntelliJ Platform
The very first step of developing an IDE on the IntelliJ Platform is obviously forking and cloning the IntelliJ Platform GitHub repository. Unsurprisingly, the IntelliJ Platform repository is tremendously huge, with more than 433K commits on its master branch at the time of writing. Appending also the fact that it is a monorepo, (your fork of the) IntelliJ Platform GitHub repository takes ages to clone if you were to clone the entire commit history.
Assuming that you have already forked the repository, run the git clone command with the --depth 1 option to only fetch the most recent commit information and avoid cloning the entire history of the repository (the following is an example, replace the repository URL with the one of your fork):
1
$ git clone https://github.com/ZigIDE/ZigZen.git --depth 1
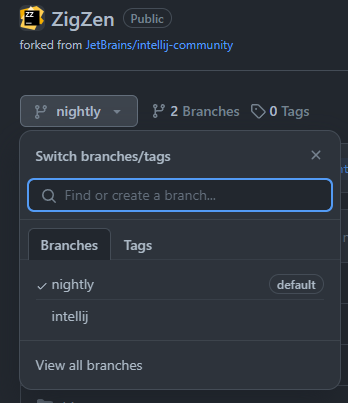
It is highly recommended that you create a separate branch as your development branch, as the master branch iterates blazingly fast and it can be hard to keep up with latest changes and fixing merge conflicts when they arise. For my case, I created a separate nightly branch from master and made that the default branch; and merging the changes from master to nightly regularly and/or when necessary:
Remember to git checkout the master branch locally, so you can pull and merge changes incoming from master as well.
After that, open the project in IntelliJ IDEA.
Setting Up Modules and Run Configuration
As I have already written quite some code at the time of writing this, I will show you the module structure of in this part:
The com.github.zigzen.main module is created by first creating it as the directory zig, and then deleting its src directory, essentially rendering a module that has no source code at all. Please do note that you create the modules in the IntelliJ (.iml) format!
The rest of the modules are pretty straightforward to create, so I skip it in this blog.
Before we continue, we have to add some dependencies to the com.github.zigzen.main module and add a run configuration for the IDE.
Module 1: Runtime Dependency intellij.platform.bootstrap
To add this runtime dependency, add the following line to your com.github.zigzen.main.iml file, within the component XML tag:
1
<orderEntry type="module" module-name="intellij.platform.bootstrap" scope="RUNTIME" />
This module contains the essential com.intellij.idea.Main class for starting the bootstrapping process of the IDE. Without this, the IDE cannot be started.
Module 2: Dependency intellij.platform.main
To add this dependency, add the following line to your com.github.zigzen.main.iml file, and similarly, within the component XML tag:
1
<orderEntry type="module" module-name="intellij.platform.main" />
Why is this dependency necessary?
If you dig through the source code of the Main.kt entrypoint, you will find the following line:
val aClass = AppMode::class.java.classLoader.loadClass("com.intellij.idea.MainImpl")
This explicitly looks for and loads the com.intellij.idea.MainImpl class by reflection. This class resides in - surprise surprise - the intellij.platform.main module. Note that the module is not a runtime dependency.
Creating the Run Configuration
To create a run configuration, open the Run Configuration tool window as follows:
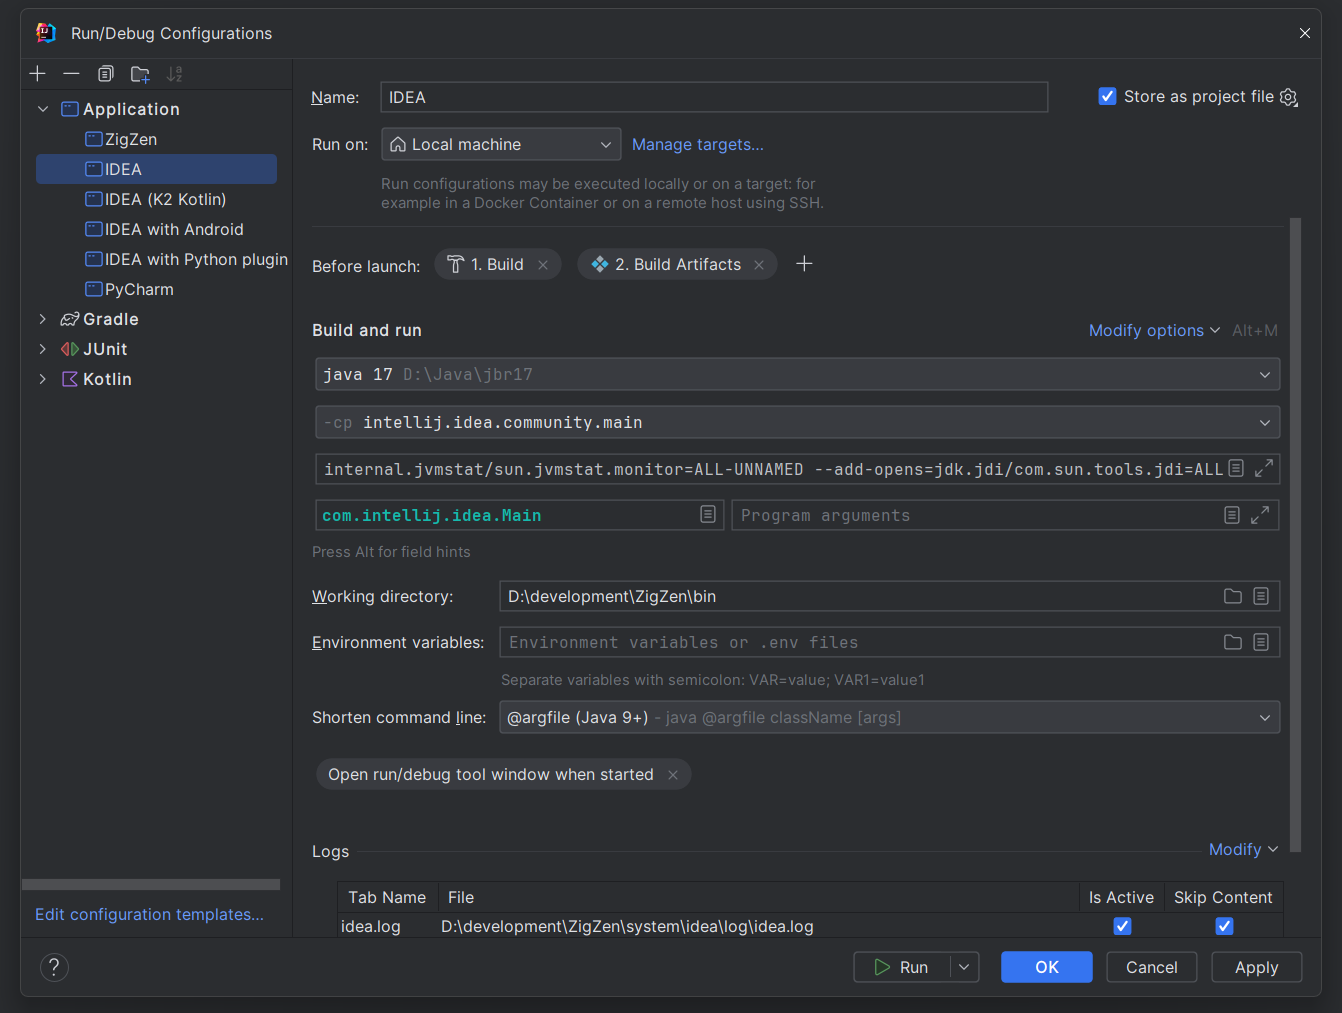
After that, you should see a similar window like this:
Create a new configuration using the + button in the upper-left corner and name the configuration. For my case, I named it ZigZen.
Select the Java Runtime to use for this run configuration. I downloaded the latest version of the JetBrains Runtime from the releases page of the JetBrains Runtime repository. For the -cp field, select the module for which its classpath should be used to run the application. This should be the “empty” module you created, containing the intellij.platform.bootstrap and intellij.platform.main dependencies.
You also need to check the Add VM options in the Modify options drop down:
For the VM options, copy the following and paste it in:
1
2
3
4
5
6
7
8
9
10
11
12
13
14
15
16
17
18
19
20
21
22
23
24
25
26
27
28
29
30
31
32
33
34
35
36
37
38
39
40
41
42
43
44
45
46
47
48
49
50
51
52
53
54
55
56
57
58
-Xmx2g
-XX:ReservedCodeCacheSize=240m
-XX:SoftRefLRUPolicyMSPerMB=50
-XX:MaxJavaStackTraceDepth=10000
-ea
-Dsun.io.useCanonCaches=false
-Dapple.laf.useScreenMenuBar=true
-Dsun.awt.disablegrab=true
-Didea.jre.check=true
-Didea.is.internal=true
-Didea.debug.mode=true
-Djdk.attach.allowAttachSelf
-Dfus.internal.test.mode=true
-Dkotlinx.coroutines.debug=off
-Djdk.module.illegalAccess.silent=true
-Didea.config.path=../config/idea
-Didea.system.path=../system/idea
-Didea.initially.ask.config=true
--add-opens=java.base/java.io=ALL-UNNAMED
--add-opens=java.base/java.lang.reflect=ALL-UNNAMED
--add-opens=java.base/java.lang=ALL-UNNAMED
--add-opens=java.base/java.net=ALL-UNNAMED
--add-opens=java.base/java.nio.charset=ALL-UNNAMED
--add-opens=java.base/java.text=ALL-UNNAMED
--add-opens=java.base/java.time=ALL-UNNAMED
--add-opens=java.base/java.util.concurrent.atomic=ALL-UNNAMED
--add-opens=java.base/java.util.concurrent=ALL-UNNAMED
--add-opens=java.base/java.util=ALL-UNNAMED
--add-opens=java.base/jdk.internal.vm=ALL-UNNAMED
--add-opens=java.base/sun.nio.ch=ALL-UNNAMED
--add-opens=java.desktop/com.apple.eawt.event=ALL-UNNAMED
--add-opens=java.desktop/com.apple.eawt=ALL-UNNAMED
--add-opens=java.desktop/com.apple.laf=ALL-UNNAMED
--add-opens=java.desktop/com.sun.java.swing.plaf.gtk=ALL-UNNAMED
--add-opens=java.desktop/java.awt.dnd.peer=ALL-UNNAMED
--add-opens=java.desktop/java.awt.event=ALL-UNNAMED
--add-opens=java.desktop/java.awt.image=ALL-UNNAMED
--add-opens=java.desktop/java.awt.peer=ALL-UNNAMED
--add-opens=java.desktop/java.awt=ALL-UNNAMED
--add-opens=java.desktop/javax.swing.plaf.basic=ALL-UNNAMED
--add-opens=java.desktop/javax.swing.text.html=ALL-UNNAMED
--add-opens=java.desktop/javax.swing=ALL-UNNAMED
--add-opens=java.desktop/sun.awt.X11=ALL-UNNAMED
--add-opens=java.desktop/sun.awt.datatransfer=ALL-UNNAMED
--add-opens=java.desktop/sun.awt.image=ALL-UNNAMED
--add-opens=java.desktop/sun.awt.windows=ALL-UNNAMED
--add-opens=java.desktop/sun.awt=ALL-UNNAMED
--add-opens=java.desktop/sun.font=ALL-UNNAMED
--add-opens=java.desktop/sun.java2d=ALL-UNNAMED
--add-opens=java.desktop/sun.lwawt.macosx=ALL-UNNAMED
--add-opens=java.desktop/sun.lwawt=ALL-UNNAMED
--add-opens=java.desktop/sun.swing=ALL-UNNAMED
--add-opens=jdk.attach/sun.tools.attach=ALL-UNNAMED
--add-opens=jdk.internal.jvmstat/sun.jvmstat.monitor=ALL-UNNAMED
--add-opens=jdk.jdi/com.sun.tools.jdi=ALL-UNNAMED
--add-opens=jdk.compiler/com.sun.tools.javac.api=ALL-UNNAMED
-Didea.platform.prefix=Zig
-Djava.system.class.loader=com.intellij.util.lang.PathClassLoader
For the -Didea.platform.prefix Java property, replace it with something else of your choice. It is only, in my case, set to Zig.
Finally, set the class com.intellij.idea.Main as the main class. You should then have something similar to the configuration you first saw when opening the Run Configurations tool window.
Writing the Application Information Manifest
To be fair, I don’t know what is the proper name for this, but based on the file I have to create, I will denote this as the “Application Information Manifest”.
Before doing so, add your “resources” module as a runtime dependency to the “empty” main module. For my case, I added the following to my com.github.zigzen.main.iml:
1
<orderEntry type="module" module-name="com.github.zigzen.resources" scope="RUNTIME" />
After that, head to your “resources” module and create a resources directory, marking it as “Resources Root”. Create an idea directory and create an XML file named <Your idea.platform.prefix Property Value>ApplicationInfo.xml.
For my case, I created a file named ZigApplicationInfo.xml as my platform prefix as specified in the idea.platform.prefix property is Zig, as aforementioned.
I added the following XML to the above created file:
1
2
3
4
5
6
7
8
<component xmlns="http://jetbrains.org/intellij/schema/application-info">
  <version major="2024" minor="1" eap="true"/>
  <company name="ZigIDE" url="https://github.com/ZigIDE"/>
  <build number="ZZ-__BUILD__" date="__BUILD_DATE__"/>
  <logo url="/zigzen_logo.png"/>
  <icon svg="/zigzen.svg" svg-small="/zigzen_16.svg"/>
  <names product="ZigZen" fullname="ZigZen" script="zigzen" motto="Powerful IDE for Zig"/>
</component>
Woah, that’s quite some stuff to digest. Let’s break this down into parts…
The version Tag
This specifies the major and minor versions of the application. The eap field specifies whether this version is an “Early Access Preview” build.
The company Tag
This specifies the vendor of the application. As I didn’t really know what to put here… I just put ZigIDE and its repository there lol
The build Tag
This specifies the build number string and build date. The ZZ prefix is a unique product code, as you may have known IU corresponds to IntelliJ IDEA Ultimate Edition and RR corresponds to RustRover.
The placeholders __BUILD__ and __BUILD_DATE__ will be replaced by actual values by the build scripts in the building process.
The logo Tag
This specifies the image to display for the splash screen on startup.
The icon Tag
This specifies the icons of the application. These are displays on taskbars, and whatnot.
The names Tag
This specifies various names of the application. product and fullname fields are the names of the application, and the script field is for the name of the script to launch the IDE in an actual binary distribution.
The motto field specifies the motto string.
GitHub Repository
The source code for this project can be found at the ZigZen repository. Contributions are very welcome!
Thoughts
Well, I guess this is it. I’ll be preparing for the next edition which should come sometime next month. Leave your comments down below if you have any questions or pretty much anything, and I’ll attempt to answer!


